|
|
|
# NeoPixel LED
|
|
|
|
|
|
|
|
참고 :
|
|
|
|
1. [https://learn.adafruit.com/adafruit-neopixel-uberguide/arduino-library-use](https://learn.adafruit.com/adafruit-neopixel-uberguide/arduino-library-use)
|
|
|
|
|
|
|
|
2. [https://www.youtube.com/watch?v=eUm32CFvEdc](https://www.youtube.com/watch?v=eUm32CFvEdc)
|
|
|
|
|
|
|
|
Neo Pixel은 Adafruit에서 제작한 LED제품으로 단일 LED, Strip타입, Ring타입, Stick타입, Sheild 타입 등 다양한 종류가 있습니다.
|
|
|
|
|
|
|
|

|
|
|
|
|
|
|
|

|
|
|
|
|
|
|
|
NeoPixel은 LED의 색감도 다양하게 표현 할 수 있으며, 모양도 여러가지가 존재합니다.
|
|
|
|
사용법은 [Adafruit](https://www.adafruit.com/) 에서 제공하는 라이브러리인 **Adafruit_NeoPixel.h**를 통해서 제어가 가능합니다.
|
|
|
|
|
|
|
|
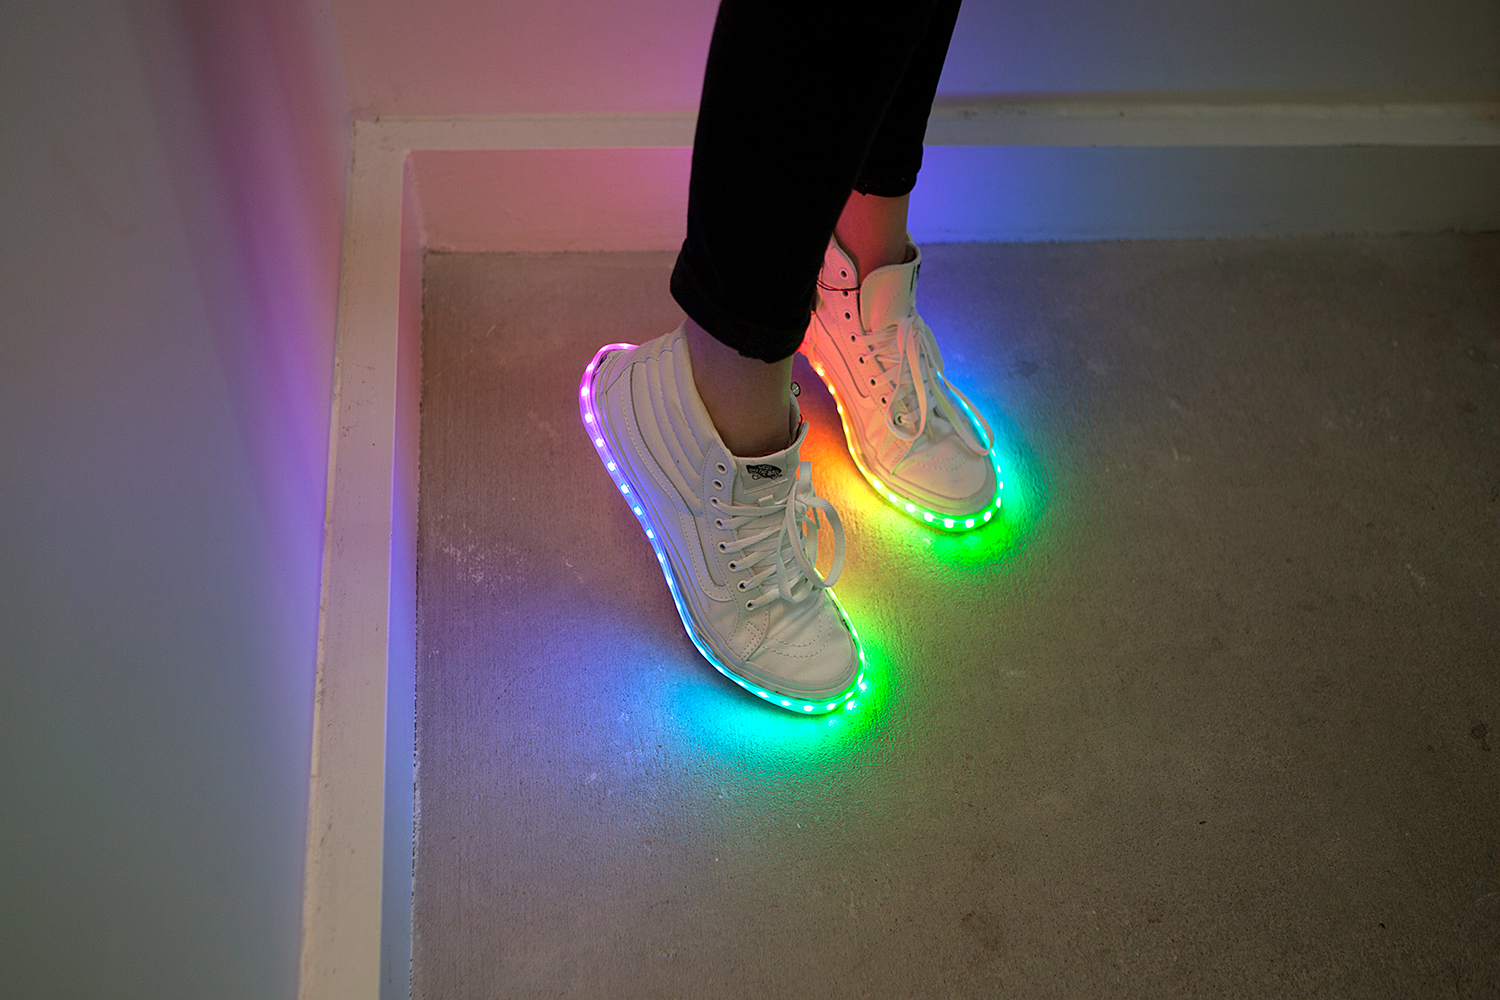
또한 NeoPixel은 Wearable 제품을 만들 때도 사용이 가능합니다.
|
|
|
|
|
|
|
|
|
|
|
|
|
|
|
|

|
|
|
|
|
|
|
|
|
|
|
|
## 참고
|
|
|
|
1. Color Wheel
|
|
|
|
Color Wheel에 관한 설명이 잘 되어 있는 페이지의 주소입니다.
|
|
|
|
|
|
|
|
[https://www.canva.com/colors/color-wheel/](https://www.canva.com/colors/color-wheel/)
|
|
|
|
|
|
|
|
2. Gamma-Correction
|
|
|
|
|
|
|
|
[https://learn.adafruit.com/led-tricks-gamma-correction?view=all](https://learn.adafruit.com/led-tricks-gamma-correction?view=all)
|
|
|
|
|
|
|
|
3. 색의 3가지 모형에 대한 참고 페이지 입니다.
|
|
|
|
|
|
|
|
[https://driz2le.tistory.com/188](https://driz2le.tistory.com/188)
|
|
|
|
|
|
|
|
```c++
|
|
|
|
#include<Adafruit_NeoPixel.h>
|
|
|
|
|
|
|
|
#define LED_PIN 6 // NeoPixel이 연결된 Arduino의 핀 번호
|
|
|
|
|
|
|
|
#define LED_COUNT 60 // 아두이노에 연결된 Neo Pixel의 수
|
|
|
|
|
|
|
|
Adafruit_NeoPixel strip(LED_COUNT,LED_PIN,NEO_GRB + NEO_KHZ800); // NeoPoxel의 객체 선언
|
|
|
|
|
|
|
|
void setup() {
|
|
|
|
strip.begin(); // NeoPixel의 출력을 위해 data pin을 준비합니다.
|
|
|
|
strip.show(); // NeoPixel에 설정한 색을 보여줍니다. 아직 아무런 설정도 안되어 있기 때문에 NeoPixel LED를 끄게 됩니다.
|
|
|
|
strip.setBrightness(50); // NeoPixel의 밝기를 조절합니다. 값은 0~255가 올수 있습니다.
|
|
|
|
// 이는 NeoPixel에 흐르는 전류를 조절하기 때문에 특별한 경우가 아니라면 한번만 호출 합니다.
|
|
|
|
}
|
|
|
|
|
|
|
|
void loop() {
|
|
|
|
// 한가지 색깔로 NeoPixel을 킵니다.
|
|
|
|
colorWipe(strip.Color(255,0,0),50); // Color는 uint32_t 타입을 반환하는 색깔 지정 함수 입니다.
|
|
|
|
colorWipe(strip.Color(124,124,0),50);
|
|
|
|
colorWipe(strip.Color(0,255,0),50);
|
|
|
|
colorWipe(strip.Color(0,124,124),50);
|
|
|
|
colorWipe(strip.Color(0,0,255),50);
|
|
|
|
|
|
|
|
theaterChase(strip.Color(127,127,127),50);
|
|
|
|
theaterChase(strip.Color(127,0,0),50);
|
|
|
|
theaterChase(strip.Color(0,0,127),50);
|
|
|
|
|
|
|
|
rainbow(50);
|
|
|
|
|
|
|
|
theaterChaseRainbow(100);
|
|
|
|
}
|
|
|
|
|
|
|
|
// NeoPixel을 차례대로 한개 씩, 한가지 색으로 밝히는 함수 입니다.
|
|
|
|
// uint32_t는 색을 표현하기위한 32비트 크기의 부호가 없는 정수형 타입입니다.
|
|
|
|
// 32-bit의 색(RGBA)은 빨간색, 녹색, 파란색, 투명도 각 8bit로 구성됩니다.
|
|
|
|
void colorWipe(uint32_t color, int wait){
|
|
|
|
for(int pos = 0; pos < strip.numPixels(); pos++){ // strip의 pixel의 수만큼 반복문을 진행 합니다.
|
|
|
|
strip.setPixelColor(pos,color); // pos위치의 pixel 색을 color로 지정합니다.
|
|
|
|
strip.show(); // strip의 설정에 따라 strip의 pixel을 제어합니다.
|
|
|
|
delay(wait); // 매개변수를 통해 전달한 지연 시간만큼 반복문을 지연 시킵니다.
|
|
|
|
}
|
|
|
|
}
|
|
|
|
|
|
|
|
|
|
|
|
// Theater-marquee-style(영화관 입구의 전광판)로 LED가 반짝이게하는 함수 입니다.
|
|
|
|
// Delay Time을 줄이면 빠르게 반짝이는 모습을 볼 수 있고, 지연 시간을 늘리면 천천히 한 픽셀이 꺼졌다 켜졌다하는 모습을 볼 수 있습니다.
|
|
|
|
void theaterChase(uint32_t color,int wait){
|
|
|
|
for(int a = 0; a < 10; a++){ // 반짝이는 행위를 10회 반복합니다.
|
|
|
|
for(int b = 0; b < 3; b++){ // LED Pixel의 시작 위치 입니다.
|
|
|
|
strip.clear(); // 이전의 Strip 상태를 모두 지웁니다.
|
|
|
|
for(int c = b; c < strip.numPixels(); c+=3){ // 시작 위치로 부터 3칸씩 떨어진 Pixel들의 색을 지정합니다.
|
|
|
|
strip.setPixelColor(c,color);
|
|
|
|
}
|
|
|
|
strip.show(); // 설정한 strip의 상태로 strip을 출력합니다.
|
|
|
|
delay(wait);
|
|
|
|
}
|
|
|
|
}
|
|
|
|
}
|
|
|
|
|
|
|
|
// 무지개빛(Color Wheel의 모든 색상)으로 전체 LED Strip을 제어하는 함수입니다.
|
|
|
|
// Wait에 따라 각 Pixel의 색변화 속도가 달라집니다.
|
|
|
|
// Color Wheel 색상의 범위는 0 ~ 65535까지(2^16) 입니다.
|
|
|
|
void rainbow(int wait){
|
|
|
|
for(long firstPixelHue = 0; firstPixelHue < 5*65536; firstPixelHue += 256){ // 첫번째 Pixel이 Color Wheel의 색을 5번 돌도록 반복합니다.
|
|
|
|
for(int pos = 0; pos < strip.numPixels(); pos++){ // 각 픽셀마다 색을 지정해줍니다.
|
|
|
|
int pixelHue = firstPixelHue + (pos*65536L/strip.numPixels()); // 픽색의 색상은 연속적으로 보이기 위하여 65536을 Strip에 있는 Pixel의 수로 나누고 위치를 곱하여 지정합니다.
|
|
|
|
strip.setPixelColor(pos, strip.gamma32(strip.ColorHSV(pixelHue))); // HSV는 빛의 3가지 속성 색상,명도,채도를 통해 색을 표현하는 것입니다.
|
|
|
|
// 따라서 ColorHSV()에는 3가지 매개 변수를 갖을 수 있는데, 여기선 색상만을 넘겨주었습니다.
|
|
|
|
// gamma32는 LED의 발광하는 빛과, 사람의 눈이 색상을 보는 것에서 오는 차이를 보정하기 위해 사용하는 gamma-correction 함수입니다.
|
|
|
|
// 이를 통해 실제 색을 명확히 볼수 있게됩니다.
|
|
|
|
}
|
|
|
|
strip.show();
|
|
|
|
delay(wait);
|
|
|
|
}
|
|
|
|
}
|
|
|
|
|
|
|
|
// 무지개 빛과 theater-marquee-style의 합성입니다.
|
|
|
|
void theaterChaseRainbow(int wait){
|
|
|
|
int firstPixelHue = 0; // 첫 번째 Pixel의 색상을 지정
|
|
|
|
for(int reTime = 0; reTime < 30; reTime++){ // 30회 반복 시행(한 픽셍당 30회씩 켜졌다 꺼졌다를 반복합니다.
|
|
|
|
for(int startPos = 0; startPos < 3 ; startPos++){ // 0번째, 1번째, 2번째 Pixel을 기준으로 합니다.
|
|
|
|
strip.clear();
|
|
|
|
for(int pos = startPos; pos < strip.numPixels(); pos += 3){ // 기준 Pixel으로부터 3칸마다 픽셀의 색상이 설정됩니다.
|
|
|
|
int hue = firstPixelHue + pos*65536L/strip.numPixels(); // 해당 픽셀의 색상을 지정합니다. 색상이 color wheel처럼 색의 변화를 보이기 휘해 Pixel의 개수만큼 나누고 위치 값을 곱하여 지정합니다.
|
|
|
|
uint32_t color = strip.gamma32(strip.ColorHSV(hue)); // 빛의 3가지 속성 중 색상을 지정하였고, gamma-correction을 위해 gamma32()함수를 사용하여 Pixel의 색상을 지정합니다.
|
|
|
|
strip.setPixelColor(pos,color);
|
|
|
|
}
|
|
|
|
strip.show();
|
|
|
|
delay(wait); // 지연시간을 줍니다.
|
|
|
|
firstPixelHue += 65536/90; // 90프레임의로 색상을 나눕니다.
|
|
|
|
}
|
|
|
|
}
|
|
|
|
}
|
|
|
|
``` |
|
|
\ No newline at end of file |
