데이터베이스
개념
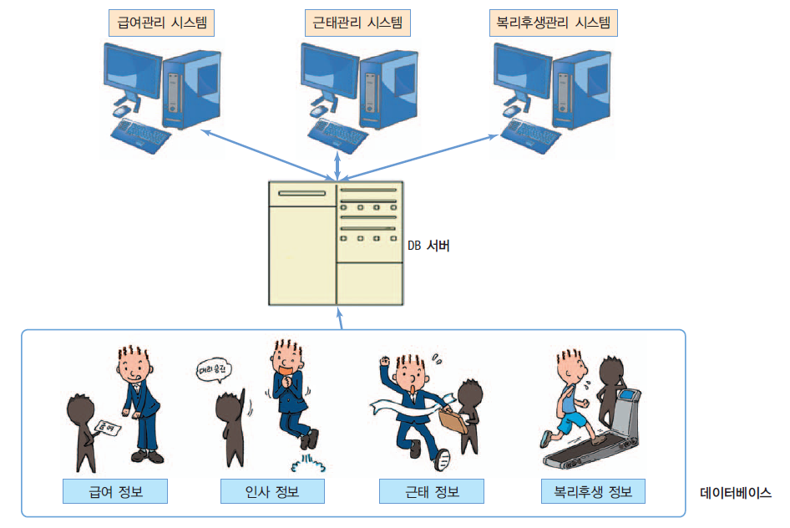
데이터베이스
여러 응용 시스템들의 통합된 정보들을 저장하여 운영할 수 있는 공용 데이터들의 집합
데이터의 저장, 검색, 갱신을 효율적으로 수행할 수 있도록 데이터를 고도로 조직화하여 저장
DBMS
데이터베이스 관리 시스템(DataBase Management System)
오라클(Oracle), 마이크로소프트의 SQL Server, MySQL, IBM의 DB2 등
데이터베이스 종류
관계형 데이터베이스
키(key)와 값(value)들의 관계를 테이블로 표현한 데이터베이스 모델
키는 테이블의 열(column)이 되며 테이블의 행(row)은 하나의 레코드(record)를 표현
현재 사용되는 대부분의 데이터베이스는 관계형 데이터베이스
객체 지향 데이터베이스
객체 지향 프로그래밍에 쓰이는 것으로, 정보를 객체의 형태로 표현하는 데이터베이스 모델
오브젝트 데이터베이스(object database)라고도 부른다.
사례
관계형 데이터베이스 구조
관계형 데이터 베이스
데이터들이 다수의 테이블로 구성
각 행은 하나의 레코드
각 테이블은 키(key)와 값(value) 들의 관계로 표현
여러 테이블 간에 공통된 이름의 열 포함
이런 경우 서로 다른 테이블 간에 관계(relation)가 성립
대부분의 데이터베이스는 관계형 데이터베이스
JDBC API

객체지향 데이터베이스
객체지향 데이터 베이스
객체 지향 프로그래밍에 사용
정보를 객체의 형태로 표현
오브젝트 데이터베이스(object database)라고도 부름
객체 모델이 그대로 데이터베이스에도 적용되므로 응용프로그램의 객체 모델과 데이터베이스의 모델이 부합됨
SQL과 JDBC
SQL(Structured Query Language)
관계형 데이터베이스 관리 시스템에서 사용
데이터베이스 스키마 생성, 자료의 검색, 관리, 수정, 그리고 데이터베이스 객체 접근 관리를 위해 고안된 언어
데이터베이스로부터 정보를 추출하거나 갱신하기 위한 표준 대화식 프로그래밍 언어
다수의 데이터베이스 관련 프로그램들이 SQL을 표준으로 채택
JDBC (Java DataBase Connectivity)
관계형 데이터베이스에 저장된 데이터를 접근 및 조작할 수 있게 하는 API
다양한 DBMS에 대해 일관된 API로 데이터베이스 연결, 검색, 수정, 관리 등을 할 수 있게 함
JDBC 구조
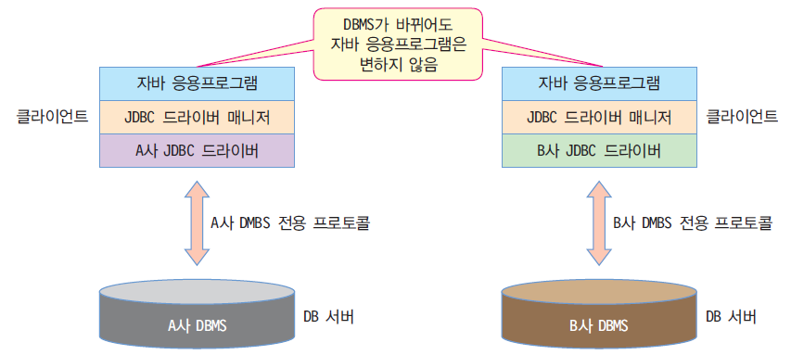
JDBC 드라이버 매니저
자바 API에서 지원하며 DBMS를 접근할 수 있는 JDBC 드라이버 로드
JDBC 드라이버
DBMS마다 고유한 JDBC 드라이버 제공, JDBC 드라이버와 DBMS는 전용 프로토콜로 데이터베이스 처리
DBMS
데이터베이스 관리 시스템. 데이터베이스 생성·삭제, 데이터 생성·검색·삭제 등 전담 소프트웨어 시스템
JDBC 프로그래밍
데이터베이스 연결 설정
MySQL 서버의 JDBC 드라이버 로드
try {
  Class.forName("com.mysql.jdbc.Driver");
} catch (ClassNotFoundException e) {
  e.printStackTrace();
}
Class.forName()은 동적으로 자바 클래스 로딩
MySQL의 JDBC 드라이버 클래스인 com.mysql.jdbc.Driver 로드
드라이버의 클래스 이름은 DB의 드라이버마다 다를 수 있으므로 JDBC 드라이버 문서 참조할 것
자동으로 드라이버 인스턴스를 생성하여 DriverManager에 등록
해당 드라이버가 없으면 ClassNotFoundException 발생
JDBC 연결
연결
try {
  Connection conn = DriverManager.getConnection("jdbc:mysql://localhost:3306/ sampledb", "root","");
} catch (SQLException e) {
  e.printStackTrace();
}
DriverManager는 자바 어플리케이션을 JDBC 드라이버에 연결시켜주는 클래스로서 getConnection() 메소드로 DB에 연결하여 Connection 객체 반환
getConnection에서 jdbc: 이후에 지정되는 URL의 형식은 DB에 따라 다르므로 JDBC 문서를 참조
MySQL 서버가 같은 컴퓨터에서 동작하므로 서버 주소를 localhost로 지정
MySQL의 경우 디폴트로 3306 포트를 사용
sampledb는 앞서 생성한 DB의 이름
“root”는 DB에 로그인할 계정 이름이며, “”는 계정 패스워드
예제: sampledb의 데이터베이스 연결
JDBC를 이용하여 sampledb 데이터베이스에 연결하는 자바 응용프로그램을 작성하라.
import java.sql.*;

public class JDBC_Ex1 {
  public static void main (String[] args) {
    try {
      Class.forName("com.mysql.jdbc.Driver");
      Connection conn = DriverManager.getConnection("jdbc:mysql://localhost:3306/   sampledb", "root","");
      System.out.println("DB 연결 완료");
    } catch (ClassNotFoundException e) {
      System.out.println("JDBC 드라이버 로드 에러");
    } catch (SQLException e) {
      System.out.println("DB 연결 오류");
    }
  }
}
데이터베이스 사용
Stetement 클래스
SQL문을 실행하기 위해서는 Statement 클래스를 이용
주요 메소드
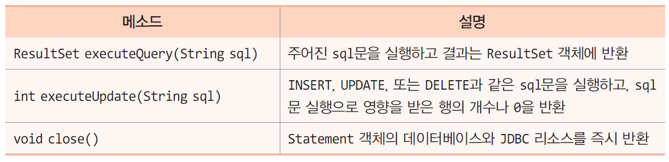
데이터 검색을 위해 executeQuery() 메소드 사용
추가, 수정, 삭제와 같은 데이터 변경은 executeUpdate() 메소드 사용
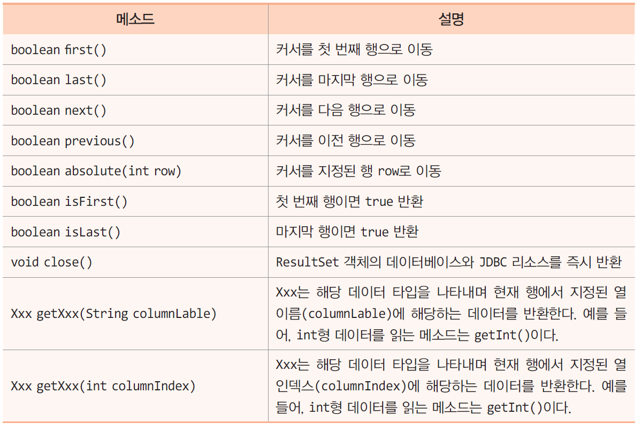
ResultSet 클래스
SQL문 실행 결과를 얻어오기 위해서는 ResultSet 클래스를 이용
현재 데이터의 행(레코드 위치)을 가리키는 커서(cursor)를 관리
커서의 초기 값은 첫 번째 행 이전을 가리킴
주요 메소드
검색
테이블의 모든 데이터 검색
Statement stmt = conn.createStatement();
ResultSet rs = stmt.executeQuery("select * from student");
Statement의 executeQuery()는 SQL문의 실행하여 실행 결과를 넘겨줌
위의 SQL문의 student 테이블에서 모든 행의 모든 열을 읽어 결과를 rs에 저장
특정 열만 검색
ResultSet rs = stmt.executeQuery("select name, id from student");
특정 열만 읽을 경우는 select문을 이용하여 특정 열의 이름 지정
조건 검색
rs = stmt.executeQuery("select name, id, dept from student where id='0494013'");
select문에서 where절을 이용하여 조건에 맞는 데이터 검색
검색된 데이터의 사용
while (rs.next()) {
  System.out.println(rs.getString("name"));
  System.out.println(rs.getString("id"));
  System.out.println(rs.getString("dept"));
}
rs.close();
Statement객체의 executeQuery() 메소드
ResultSet 객체 반환
ResultSet 인터페이스
DB에서 읽어온 데이터를 추출 및 조작할 수 있는 방법 제공
next() 메소드
다음 행으로 이동
예제: 데이터 검색과 출력
앞서 생성한 sampledb의 student 테이블의 모든 데이터를 출력하고, 특별히 이름이 “이기자”인 학생의 데이터를 출력하는 프로그램을 작성하라.
import java.io.*;
import java.sql.*;

public class JDBC_Ex2 {
  public static void main (String[] args) {
    Connection conn;
    Statement stmt = null;
    try {
      Class.forName("com.mysql.jdbc.Driver");
      conn = DriverManager.getConnection("jdbc:mysql://localhost:3306/sampledb",  "root","");
      System.out.println("DB 연결 완료");
      stmt = conn.createStatement();
      ResultSet srs = stmt.executeQuery("select * from student");
      printData(srs, "name", "id", "dept");
      srs = stmt.executeQuery("select name, id, dept from student where   name='이기자'");
      printData(srs, "name", "id", "dept");
    } catch (ClassNotFoundException e) {
      System.out.println("JDBC 드라이버 로드 에러");
    } catch (SQLException e) {
      System.out.println("SQL 실행 에러");
    } catch (UnsupportedEncodingException e) {
      System.out.println("지원되지 않는 인코딩 타입");
    }
  }

  private static void printData(ResultSet srs, String col1, String col2, String col3)
       throws SQLException {
    while (srs.next()) {
      if (!col1.equals(""))
        System.out.print(new String(srs.getString("name").getBytes("ISO-8859-1")));
      if ((!col2.equals(""))
        System.out.print("\t|\t" + srs.getString("id"));
      if ((!col3.equals(""))
        System.out.println("\t|\t" + new String(srs.getString("dept").getBytes  ("ISO-8859-1")));
      else
        System.out.println();
    }
  }
}
DB 연결 완료
이기자 | 0494013 | 컴퓨터공학
김철수 | 1091011 | 컴퓨터시스템
이기자 | 0494013 | 컴퓨터공학
데이터 변경
레코드 추가
stmt.executeUpdate("insert into student (name, id, dept) values('아무개',
  '0893012', '컴퓨터공학');");
DB에 변경을 가하는 조작은 executeUpdate() 메소드 사용
SQL문 수행으로 영향을 받은 행의 개수 반환
데이터 수정
stmt.executeUpdate("update student set id='0189011' where name='아무개'");
레코드삭제
stmt.executeUpdate("delete from student where name='아무개'");
예제: 데이터 변경
앞서 생성한 sampledb의 student 테이블에 새로운 학생 정보를 추가하고, 새로 생성된 학생의 정보를 수정한 후에 다시 삭제하는 코드를 작성하라. 데이터가 변경될 때마다 모든 테이블의 내용을 출력하도록 하라.
import java.io.*;
import java.sql.*;

public class JDBC_Ex3 {
  public static void main (String[] args) {
    Connection conn;
    Statement stmt = null;
    try {
      Class.forName("com.mysql.jdbc.Driver");
      conn = DriverManager.getConnection("jdbc:mysql://localhost:3306/sampledb",  "root","");
      System.out.println("DB 연결 완료");
      stmt = conn.createStatement();
       stmt.exe cuteUpdate("insert into student (name, id, dept) values('아무개',  '0893012', '컴퓨터공학');");
      printTable(stmt);
      stmt.executeUpdate( "update student set id='0189011' where name='아무개'");
      printTable(stmt);
      stmt.executeUpdate("delete from student where name='아무개'");
      printTable(stmt);
    } catch (ClassNotFoundException e) {
      System.out.println("JDBC 드라이버 로드 에러");
    } catch (SQLException e) {
      System.out.println("SQL 실행 에러");
    }
}

private static void printTable(Statement stmt) throws SQLException {
    ResultSet srs = stmt.executeQuery("select * from student");
    while (srs.next()) {
      System.out.print(new String(srs.getString("name").getBytes("ISO-8859-1")));
      System.out.print("\t|\t" + srs.getString("id"));
      System.out.println("\t|\t" + new String(srs.getString("dept").getBytes  ("ISO-8859-1")));
    }
  }
}
DB 연결 완료
이기자 | 0494013 | 컴퓨터공학
아무개 | 0893012 | 컴퓨터공학
김철수 | 1091011 | 컴퓨터시스템
아무개 | 0189011 | 컴퓨터공학
이기자 | 0494013 | 컴퓨터공학
김철수 | 1091011 | 컴퓨터시스템
이기자 | 0494013 | 컴퓨터공학
김철수 | 1091011 | 컴퓨터시스템
Sqlite
sqlite를 그레이들 프로젝트에서 사용하기 위해서는 build.gradle 파일 안에, dependencies 부분에 다음을 넣어 주고 저장한 후, 프로젝트 창에서 마우스 오른쪽 클릭하여 Gradle > Refresh Gradle Project를 눌러서 필요한 패키지를 다운받아 사용할 수 있게합니다.
// https://mvnrepository.com/artifact/org.xerial/sqlite-jdbc
compile group: 'org.xerial', name: 'sqlite-jdbc', version: '3.28.0'
자세한 것은 https://github.com/xerial/sqlite-jdbc 사이트를 참조바랍니다.
데이터베이스 생성
데이터베이스 파일이름을 지정해서 데이터베이스를 생성합니다. 파일 이름이 존재하지 않으면 새로 만듭니다. 여기서는 test.db 라는 파일의 데이터베이스를 만듭니다.
import java.sql.Connection;
import java.sql.DatabaseMetaData;
import java.sql.DriverManager;
import java.sql.SQLException;

public class Main {

    /**
     * Connect to a sample database
     *
     * @param fileName the database file name
     */
    public static void createNewDatabase(String fileName) {

        String url = "jdbc:sqlite:C:/sqlite/db/" + fileName;

        try (Connection conn = DriverManager.getConnection(url)) {
            if (conn != null) {
                DatabaseMetaData meta = conn.getMetaData();
                System.out.println("The driver name is " + meta.getDriverName());
                System.out.println("A new database has been created.");
            }

        } catch (SQLException e) {
            System.out.println(e.getMessage());
        }
    }

    /**
     * @param args the command line arguments
     */
    public static void main(String[] args) {
        createNewDatabase("test.db");
    }
}
테이블 생성
import java.sql.Connection;
import java.sql.DriverManager;
import java.sql.SQLException;
import java.sql.Statement;

public class Main {

    /**
     * Create a new table in the test database
     *
     */
    public static void createNewTable() {
        // SQLite connection string
        String url = "jdbc:sqlite:C://sqlite/db/tests.db";

        // SQL statement for creating a new table
        String sql = "CREATE TABLE IF NOT EXISTS warehouses (\n"
                + "    id integer PRIMARY KEY,\n"
                + "    name text NOT NULL,\n"
                + "    capacity real\n"
                + ");";

        try (Connection conn = DriverManager.getConnection(url);
                Statement stmt = conn.createStatement()) {
            // create a new table
            stmt.execute(sql);
        } catch (SQLException e) {
            System.out.println(e.getMessage());
        }
    }

    /**
     * @param args the command line arguments
     */
    public static void main(String[] args) {
        createNewTable();
    }

}
자료 추가
import java.sql.Connection;
import java.sql.DriverManager;
import java.sql.PreparedStatement;
import java.sql.SQLException;

public class InsertApp {

    /**
     * Connect to the test.db database
     *
     * @return the Connection object
     */
    private Connection connect() {
        // SQLite connection string
        String url = "jdbc:sqlite:C://sqlite/db/test.db";
        Connection conn = null;
        try {
            conn = DriverManager.getConnection(url);
        } catch (SQLException e) {
            System.out.println(e.getMessage());
        }
        return conn;
    }

    /**
     * Insert a new row into the warehouses table
     *
     * @param name
     * @param capacity
     */
    public void insert(String name, double capacity) {
        String sql = "INSERT INTO warehouses(name,capacity) VALUES(?,?)";

        try (Connection conn = this.connect();
                PreparedStatement pstmt = conn.prepareStatement(sql)) {
            pstmt.setString(1, name);
            pstmt.setDouble(2, capacity);
            pstmt.executeUpdate();
        } catch (SQLException e) {
            System.out.println(e.getMessage());
        }
    }

    /**
     * @param args the command line arguments
     */
    public static void main(String[] args) {

        InsertApp app = new InsertApp();
        // insert three new rows
        app.insert("Raw Materials", 3000);
        app.insert("Semifinished Goods", 4000);
        app.insert("Finished Goods", 5000);
    }

}
자료 검색
먼저, SQLite database에 연결하기 위해서
Connection객체를 생성합니다.다음으로
Connection객체로부터Statement클래스 인스턴스를 생성합니다.Statement객체의 메소드executeQuery를 호출함으로ResultSet클래스 인스턴스를 생성합니다.executeQuery()메소드는 SELECT 문을 입력받습니다.이후로는
ResultSet객체의next()메소드를 이용해서 결과 집합을 순회합니다.마지막으로,
ResultSet의 get 메소드들getInt(),getString(),getDouble()을 이용해서 원하는 결과값을 얻습니다.
import java.sql.DriverManager;
import java.sql.Connection;
import java.sql.ResultSet;
import java.sql.SQLException;
import java.sql.Statement;

/**
 *
 * @author sqlitetutorial.net
 */
public class SelectApp {

    /**
     * Connect to the test.db database
     * @return the Connection object
     */
    private Connection connect() {
        // SQLite connection string
        String url = "jdbc:sqlite:C://sqlite/db/test.db";
        Connection conn = null;
        try {
            conn = DriverManager.getConnection(url);
        } catch (SQLException e) {
            System.out.println(e.getMessage());
        }
        return conn;
    }


    /**
     * select all rows in the warehouses table
     */
    public void selectAll(){
        String sql = "SELECT id, name, capacity FROM warehouses";

        try (Connection conn = this.connect();
             Statement stmt  = conn.createStatement();
             ResultSet rs    = stmt.executeQuery(sql)){

            // loop through the result set
            while (rs.next()) {
                System.out.println(rs.getInt("id") +  "\t" +
                                   rs.getString("name") + "\t" +
                                   rs.getDouble("capacity"));
            }
        } catch (SQLException e) {
            System.out.println(e.getMessage());
        }
    }


    /**
     * @param args the command line arguments
     */
    public static void main(String[] args) {
        SelectApp app = new SelectApp();
        app.selectAll();
    }

}
매개변수로 질의
질의문에서 매개변수를 이용하려면 PreparedStatement 객체를 이용합니다.
/**
 * Get the warehouse whose capacity greater than a specified capacity
 * @param capacity
 */
public void getCapacityGreaterThan(double capacity){
           String sql = "SELECT id, name, capacity "
                      + "FROM warehouses WHERE capacity > ?";

    try (Connection conn = this.connect();
         PreparedStatement pstmt  = conn.prepareStatement(sql)){

        // set the value
        pstmt.setDouble(1,capacity);
        //
        ResultSet rs  = pstmt.executeQuery();

        // loop through the result set
        while (rs.next()) {
            System.out.println(rs.getInt("id") +  "\t" +
                               rs.getString("name") + "\t" +
                               rs.getDouble("capacity"));
        }
    } catch (SQLException e) {
        System.out.println(e.getMessage());
    }
}
자료 변경
First, connect to the SQLite database.
Next, prepare the UPDATE statement. For the
UPDATEstatement that uses parameters, you use the question marks (?) placeholder in theSETandWHEREclauses.Then, instantiate an object the
PreparedStatementclass by calling theprepareStatement()method of theConnectionobject.After that, set a value for each placeholder using the set method of the
PreparedStatementobject, for example,setString(),setInt(), etc.Finally, execute the
UPDATEstatement by calling theexecuteUpdate()method of thePreparedStatementobject.
import java.sql.Connection;
import java.sql.DriverManager;
import java.sql.PreparedStatement;
import java.sql.SQLException;

/**
 *
 * @author sqlitetutorial.net
 */
public class UpdateApp {

    /**
     * Connect to the test.db database
     *
     * @return the Connection object
     */
    private Connection connect() {
        // SQLite connection string
        String url = "jdbc:sqlite:C://sqlite/db/test.db";
        Connection conn = null;
        try {
            conn = DriverManager.getConnection(url);
        } catch (SQLException e) {
            System.out.println(e.getMessage());
        }
        return conn;
    }

    /**
     * Update data of a warehouse specified by the id
     *
     * @param id
     * @param name name of the warehouse
     * @param capacity capacity of the warehouse
     */
    public void update(int id, String name, double capacity) {
        String sql = "UPDATE warehouses SET name = ? , "
                + "capacity = ? "
                + "WHERE id = ?";

        try (Connection conn = this.connect();
                PreparedStatement pstmt = conn.prepareStatement(sql)) {

            // set the corresponding param
            pstmt.setString(1, name);
            pstmt.setDouble(2, capacity);
            pstmt.setInt(3, id);
            // update
            pstmt.executeUpdate();
        } catch (SQLException e) {
            System.out.println(e.getMessage());
        }
    }

    /**
     * @param args the command line arguments
     */
    public static void main(String[] args) {

        UpdateApp app = new UpdateApp();
        // update the warehouse with id 3
        app.update(3, "Finished Products", 5500);
    }

}
자료 삭제
First, create a database connection to the SQLite database.
Next, prepare the DELETE statement. In case you want the statement takes parameters, you use the question mark (?) placeholder inside the statement.
Then, create a new instance of the
PreparedStatementclass by calling theprepareStatement()method of theConnectionobject.After that, supply values in place of the question mark placeholder using the set method of the
PreparedStatementobject e.g.,setInt(),setString(), etc.Finally, execute the
DELETEstatement by calling theexecuteUpdate()method of thePreparedStatementobject.
import java.sql.Connection;
import java.sql.DriverManager;
import java.sql.PreparedStatement;
import java.sql.SQLException;

/**
 *
 * @author sqlitetutorial.net
 */
public class DeleteApp {

    /**
     * Connect to the test.db database
     *
     * @return the Connection object
     */
    private Connection connect() {
        // SQLite connection string
        String url = "jdbc:sqlite:C://sqlite/db/test.db";
        Connection conn = null;
        try {
            conn = DriverManager.getConnection(url);
        } catch (SQLException e) {
            System.out.println(e.getMessage());
        }
        return conn;
    }

    /**
     * Delete a warehouse specified by the id
     *
     * @param id
     */
    public void delete(int id) {
        String sql = "DELETE FROM warehouses WHERE id = ?";

        try (Connection conn = this.connect();
                PreparedStatement pstmt = conn.prepareStatement(sql)) {

            // set the corresponding param
            pstmt.setInt(1, id);
            // execute the delete statement
            pstmt.executeUpdate();

        } catch (SQLException e) {
            System.out.println(e.getMessage());
        }
    }

    /**
     * @param args the command line arguments
     */
    public static void main(String[] args) {
        DeleteApp app = new DeleteApp();
        // delete the row with id 3
        app.delete(3);
    }

}
package database;

import java.sql.Connection;
import java.sql.DatabaseMetaData;
import java.sql.DriverManager;
import java.sql.PreparedStatement;
import java.sql.ResultSet;
import java.sql.SQLException;
import java.sql.Statement;

public class SqliteTest {

  public static void createDatabase(String fileName) {

    String url = "jdbc:sqlite:" + fileName;
    try (Connection conn = DriverManager.getConnection(url)) {
      if (conn != null) {
          DatabaseMetaData meta = conn.getMetaData();
          System.out.println("The driver name is " + meta.getDriverName());
          System.out.println("A new database has been created.");
      }
    } catch (SQLException e) {
      System.out.println(e.getMessage());
    }
  }

//    public static void connect() {
//            Connection conn = null;
//        try {
//            // db parameters
//            String url = "jdbc:sqlite:sample.db";
//            // create a connection to the database
//            conn = DriverManager.getConnection(url);
//
//            System.out.println("Connection to SQLite has been established.");
//
//        } catch (SQLException e) {
//            System.out.println(e.getMessage());
//        } finally {
//            try {
//                if (conn != null) {
//                    conn.close();
//                }
//            } catch (SQLException ex) {
//                System.out.println(ex.getMessage());
//            }
//        }
//    }

  public static void createNewTable() {
        // SQLite connection string
        String url = "jdbc:sqlite:test.db";

        // SQL statement for creating a new table
        String sql = "CREATE TABLE IF NOT EXISTS warehouses (\n"
                + "   id integer PRIMARY KEY,\n"
                + "   name text NOT NULL,\n"
                + "   capacity real\n"
                + ");";

        try (Connection conn = DriverManager.getConnection(url);
                Statement stmt = conn.createStatement()) {
            // create a new table
            stmt.execute(sql);
        } catch (SQLException e) {
            System.out.println(e.getMessage());
        }
    }

  private Connection connect() {
        // SQLite connection string
        String url = "jdbc:sqlite:test.db";
        Connection conn = null;
        try {
            conn = DriverManager.getConnection(url);
        } catch (SQLException e) {
            System.out.println(e.getMessage());
        }
        return conn;
    }

  public void insert(String name, double capacity) {
        String sql = "INSERT INTO warehouses(name,capacity) VALUES(?,?)";

        try (Connection conn = this.connect();
                PreparedStatement pstmt = conn.prepareStatement(sql)) {
            pstmt.setString(1, name);
            pstmt.setDouble(2, capacity);
            pstmt.executeUpdate();
        } catch (SQLException e) {
            System.out.println(e.getMessage());
        }
    }

  public void selectAll(){
        String sql = "SELECT id, name, capacity FROM warehouses";

        try (Connection conn = this.connect();
             Statement stmt  = conn.createStatement();
             ResultSet rs    = stmt.executeQuery(sql)){

            // loop through the result set
            while (rs.next()) {
                System.out.println(rs.getInt("id") +  "\t" +
                                   rs.getString("name") + "\t" +
                                   rs.getDouble("capacity"));
            }
        } catch (SQLException e) {
            System.out.println(e.getMessage());
        }
    }

  public void update(int id, String name, double capacity) {
        String sql = "UPDATE warehouses SET name = ? , "
                + "capacity = ? "
                + "WHERE id = ?";

        try (Connection conn = this.connect();
                PreparedStatement pstmt = conn.prepareStatement(sql)) {

            // set the corresponding param
            pstmt.setString(1, name);
            pstmt.setDouble(2, capacity);
            pstmt.setInt(3, id);
            // update
            pstmt.executeUpdate();
        } catch (SQLException e) {
            System.out.println(e.getMessage());
        }
    }

  public void delete(int id) {
        String sql = "DELETE FROM warehouses WHERE id = ?";

        try (Connection conn = this.connect();
                PreparedStatement pstmt = conn.prepareStatement(sql)) {

            // set the corresponding param
            pstmt.setInt(1, id);
            // execute the delete statement
            pstmt.executeUpdate();

        } catch (SQLException e) {
            System.out.println(e.getMessage());
        }
    }

  public static void main(String[] args) {
//            createDatabase("test.db");
//            connect();
    createNewTable();

    SqliteTest app = new SqliteTest();
        // insert three new rows
//        app.insert("Raw Materials", 3000);
//        app.insert("Semifinished Goods", 4000);
//        app.insert("Finished Goods", 5000);

        app.selectAll();
//        app.update(3, "Finished Products", 5500);
//        app.delete(6);
        app.selectAll();
  }
}